


NEED A WAY TO ADD HOT WATER TO YOUR OFF-GRID HOME?
This is not your quick 6 minute re-heat option but rather one that given enough time can serve up enough hot water for a nice outdoor shower.
How much time it takes depends somewhat upon the season and the climate. It is always a good recommendation to insulate the heater to help maintain the warmth.
The bad news is, this is a fair-weather friend of a water heater. Because the system is actually based on water, it has to be drained when the weather turns cold.
But a nice hot bath does have a nice sound when working off-grid. Ready? The steps to building a solar powered water heater are here:
This is a very simple design for a batch-type solar water heater that uses a thermosiphon loop to move water between a solar thermal collector and a storage barrel.
The system can provide useful amounts of hot water for an outdoor shower, washing garden produce, keeping a biogas generator warm, or any number of other uses you can think of.
The parts list includes recommended materials and temperature ratings.
MATERIALS LIST
Four 8-foot 2x4s
Five 8-foot 1x4s
2 1/2? deck screws
3/4? roofing screws or galvanized sheet metal screws
Two 2 x 8-foot corrugated metal roofing panels
High-temperature, flat black spray paint
One 100-foot, black EPDM rubber garden hose, 3/4?
I.D. (inner diameter), rated for 200F
One hundred 8? black plastic cable ties, UV-resistant, heat-stabilized, rated for over 200F
One 55-gallon barrel, black plastic, preferably with wide-mouth top
Two 3/4? NPT (National Pipe Thread) /GHT (garden hose thread) brass faucets, rated for 180F
Teflon tape
Two 3/4? polypropylene bulkhead fittings, rated for 180F
Two 3/4? brass garden hose-to-tubing adapters
Two hose clamps
One 36″ length foam pipe insulation
1. BUILD THE COLLECTOR STRUCTURE
Construct two A-frame supports using 2x4s and 2 1/2? deck screws: Position the front leg of each support at the desired tilt angle for the collector panel (your latitude angle is a good starting point), and attach the rear leg at an opposing angle for stability. Join the two legs (front and back) of each side with a horizontal cross piece.
Space the A-frame supports about 6 feet apart, and join the two back legs with two diagonal 1x4s to keep the frame from racking. Install three 8-foot pieces of 14 horizontally across the supports. Locate one piece at the tops of the supports, one 24? down from the tops, and one with its bottom edge 48? from the tops. Fasten the 1x4s to the supports with the deck screws.
Mount the roofing panels to the wood frame, using 3/4? roofing screws or sheet metal screws. Install the lower panel first, fastening it to the bottom 14. Install the upper panel so it overlaps the lower panel, then fasten through both panels into the center 14. Fasten the upper panel to the top 14.
Paint the top surface of the roofing panels with high-temperature, flat black spray paint (the kind used for painting wood stoves). Let the paint dry completely.
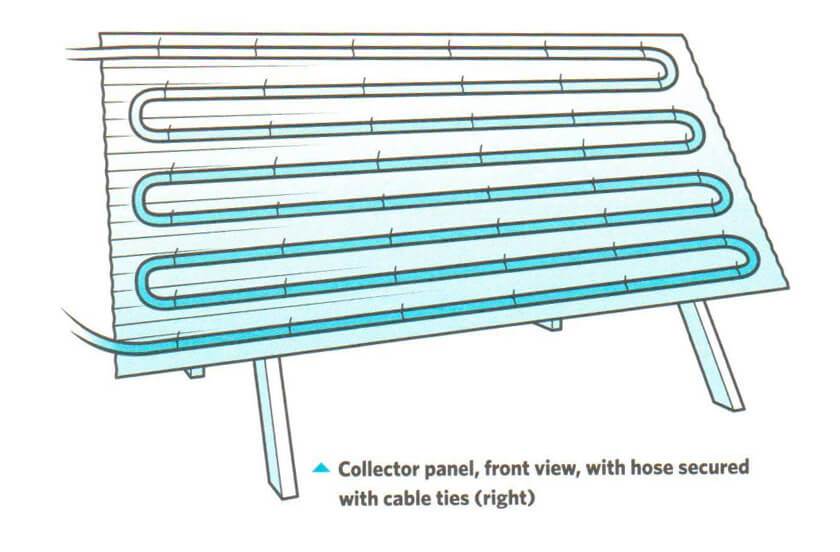
 2. INSTALL THE COLLECTOR HOSE
Lay out and mark the hose path on the collector panel, using full-length horizontal runs back and forth, working from the bottom of the panel to the top. Do not exceed the bending radius of the hose at the ends, as kinks in the hose will stop the flow and can lead to trapped air bubbles. A 3/4? I.D. hose should allow for eight horizontal runs across the 4-foot-tall panel. Be sure to leave extra hose at the beginning and end for connecting both ends to the storage barrel.
Note: As the water in the hose heats up, air will be released from it. Keeping the hose runs reasonably level, with no kinks or sags, allows the thermosiphon to work effectively, eliminates trapped air bubbles, and facilitates draining the collector.
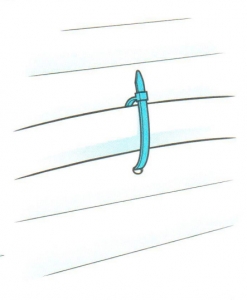
Secure the hose by drilling pairs of holes through the collector panel, one above and one below the hose, then loosely fastening the hose with a plastic cable tie (zip tie). Add a tie about every 12? along the entire path of the hose. Make sure the hose is in full contact with the collector panel for best heat transfer. You will tighten the ties later, after the hose is connected to the barrel and all fits well.
3. Prepare the water storage barrel
The barrel gets two threaded bulkhead fittings to provide a watertight connection through its side. The fittings receive the tapered threaded ends (not the garden-hose ends) of the faucets that will connect with the collector hose. Make sure the faucets are compatible with the bulkhead fittings and the adapters for connecting the collector hose.
Cut a hole through the barrel for each fitting, using the appropriate size of hole saw. Position the lower hole as close to the bottom of the barrel as possible, and locate the upper hole about one-third of the way down from the top of the barrel. Choose areas with no raised markings and little curve in the barrel surface to ensure a watertight seal.
Wrap the threaded end of each faucet with Teflon tape, and thread it into the exterior half of a fitting. Fit each fitting into its hole and secure it inside the barrel with its nut.

4. SET THE BARREL AND CONNECT THE HOSE
Position the barrel on a sturdy stand that is tall enough so that the faucets on the barrel are higher than their corresponding hoses mounted on the collector. Position the collector close to the barrel. Extend the lower end of the hose to the lower faucet, and cut the hose to length so it makes a smooth upward arch toward the faucet. Make sure the hose doesn’t sag, which can trap air or create a heat trap,” stopping the thermosiphon action. Cut the upper hose end to connect to the upper faucet.
Install a tubing-to-faucet adapter on each end of the hose, securing it with a hose clamp. Thread the hoses onto the faucets. Tighten the cable ties on the collector panel so they hold the hose securely in place. Put a piece of foam pipe insulation on the hot water (top) hose to help reduce heat loss and increase the effectiveness of the thermosiphon.
5. GET STARTED MAKING HOT WATER
Open the faucet valves, and fill the barrel to the top, leaving 1? or 2? of air space for expansion. You want to be sure that there is no air in the collector loop. Tilt the collector back and forth (one tilt for each hose bend) after the barrel is filled to be sure that all the air is out of the hose.
You’ll start making hot water as soon as the sun comes out. Cold water sinks to the bottom of the barrel and continues down the hose to the bottom of the collector. As the water is heated it rises up through the hose, through the top faucet, and into the barrel, where it rises to the top. There will be a noticeable temperature stratification within the barrel until the water is completely heated.
As an example, on a sunny 45F day, I achieved a 40F temperature rise through the collector loop using about 75 feet of 3/4? hose laid out on the collector, plus another 8 feet leading to and from the storage barrel. This was at a fairly low flow rate, and resulted in a 10F per hour temperature rise within the stored water during the hours just before and just after noon.
IDEAS FOR UPGRADES
With some additional effort, you can increase the efficiency of the system and even bring the hot water you make into your home, where it can preheat the water in your existing water heater. Check local plumbing codes before modifying your water heater. Using a heat exchanger in between your solar collector and water heater means you won’t be putting potentially non-potable water into the water heater.
Insulate the water storage barrel to keep the water hotter for longer periods.
Enclose the collector in a box for hotter water. Insulate the box on the bottom, and cover it with a piece of UV resistant clear Plexiglas or flexible fiber-reinforced plastic (FRP). Note: Enclosing the collector may make temperatures exceed the materials’ ratings, requiring the use of all metal components.
Collect and store more solar energy by increasing the collector area and the length of the circulation hose.
Switch to an active system with the addition of a small solar-powered 12- volt DC pump that moves less than 2 gallons per minute; this frees you from the constraints of a thermosiphon system.
Optional equipment for water circulation is available through local and online renewable energy dealers. This includes a low-wattage, 12-volt DC circulator pump that can operate from a 5- or 10-watt solar panel. If you make this investment, you will also want to spend a bit more to insulate the storage barrel and enclose the collector.